Configuring CloudFront to compress objects in AWS CDK
- Published on
- Authors
- Name
- Binh Bui
- @bvbinh


Photo by Johannes Plenio
CloudFront Serving compressed files
You can use CloudFront to automatically compress certain types of objects (files) and serve the compressed objects when viewers (web browsers or other clients) support them. Viewers indicate their support for compressed objects with the Accept-Encoding HTTP header. CloudFront can compress objects using the Gzip and Brotli compression formats. When the viewer supports both formats, CloudFront prefers Brotli.
How to do it in AWS CDK
Step 1: Create a content bucket
// content bucket
const bucket = new s3.Bucket(this, 'demo-bucket', {
  publicReadAccess: false, // no public access, user must access via cloudfront
  blockPublicAccess: s3.BlockPublicAccess.BLOCK_ALL,

  /**
   * The default removal policy is RETAIN, which means that cdk destroy will not attempt to delete
   * the new bucket, and it will remain in your account until manually deleted. By setting the policy to
   * DESTROY, cdk destroy will attempt to delete the bucket, but will error if the bucket is not empty.
   */
  removalPolicy: RemovalPolicy.DESTROY, // NOT recommended for production code

  /**
   * For sample purposes only, if you create an S3 bucket then populate it, stack destruction fails.  This
   * setting will enable full cleanup of the demo.
   */
  autoDeleteObjects: true, // NOT recommended for production code
})
Step 2: Create a cloudfront OAI (origin access identity)
// cloudfront OAI (origin access identity)
const cloudfrontOAI = new cloudfront.OriginAccessIdentity(this, 'my-oai', {
  comment: 'demo-bucket origin access identity',
})

// assign get object permission to cloudfront OAI
bucket.addToResourcePolicy(
  new iam.PolicyStatement({
    actions: ['s3:GetObject'],
    resources: [bucket.arnForObjects('*')],
    principals: [
      new iam.CanonicalUserPrincipal(cloudfrontOAI.cloudFrontOriginAccessIdentityS3CanonicalUserId),
    ],
  })
)
Step 3: Create a cloudfront distribution base on the content bucket and OAI
const distribution = new cloudfront.Distribution(this, 'my-distribution', {
  comment: 'demo-bucket distribution',
  defaultBehavior: {
    origin: new origins.S3Origin(bucket, {
      // Restrict viewer access, viewers must use CloudFront signed URLs or signed cookies to access your content.
      originAccessIdentity: cloudfrontOAI,
    }),
    // Serving compressed files
    compress: true,
    // Allowed GET HEAD and OPTIONS requests
    allowedMethods: cloudfront.AllowedMethods.ALLOW_GET_HEAD_OPTIONS,
    // redirects from HTTP to HTTPS, using a CloudFront distribution,
    viewerProtocolPolicy: cloudfront.ViewerProtocolPolicy.REDIRECT_TO_HTTPS,
  },
})
The code for this article is available on GitHub
Testing
Deploy stack
yarn deploy
Wait for the stack to be created. After the stack is created, upload some files to the bucket. Note File types that CloudFront compresses
You can try to upload file data/site.xml then access it via CloudFront.


That all, you can download sample source code form my git.
Clean up
Don't forget to delete the stack to avoid leaving resources in your account.
npx cdk destroy
Thanks for reading! I hope you find this article useful. If you have any questions, please feel free to leave a comment.
Bonus tip
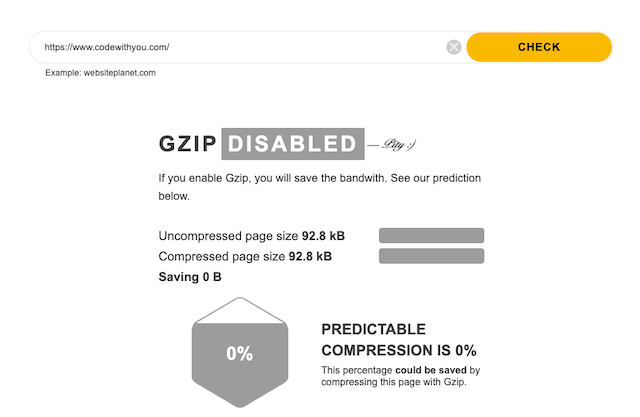
How to know your site is serving compressed files? It's easy, you can use websiteplanet to check it.
This is the result of my site.