Deploying a Web Server to AWS EC2 with AWS CDK. Step-by-step.
- Published on
- Authors
- Name
- Binh Bui
- @bvbinh


Deploying a web server to the cloud can be a complex process, involving various configurations and settings. However, with the power of AWS CDK (Cloud Development Kit), the process becomes simpler and more efficient. In this tutorial, we will explore how to deploy a web server to AWS EC2 using AWS CDK, an infrastructure-as-code framework that allows you to define cloud resources using familiar programming languages.
Table of Contents:
- Prerequisites
- Setting up the Development Environment
- Initializing a new CDK Project
- Installing Required Dependencies
- Writing the CDK Code
- Deploying the Web Server
- Accessing the Web Server
- Conclusion
Prerequisites
Before getting started, make sure you have the following prerequisites:
- Basic understanding of AWS services
- Node.js installed on your machine
- An AWS account
Setting up the Development Environment
To begin, let's set up our development environment by installing the AWS CDK toolkit globally. Open your terminal and run the following command:
npm install -g aws-cdk
This will install the necessary toolkit for working with AWS CDK.
Initializing a new CDK Project
Next, let's create a new directory for our CDK project and initialize a new CDK project with TypeScript. Run the following commands in your terminal:
mkdir my-web-server
cd my-web-server
cdk init app --language typescript
This will create the necessary files and folders for your CDK project.
Installing Required Dependencies
In order to create an EC2 instance, we need to install the AWS EC2 package. Run the following command in your project directory:
npm install @aws-cdk/aws-ec2
This will install the required dependency for working with EC2 resources in CDK.
Writing the CDK Code
Now let's write the CDK code that will create our web server infrastructure on AWS EC2. Open the lib/my-web-server-stack.ts file and replace its contents with the following code:
import * as cdk from 'aws-cdk-lib'
import * as ec2 from 'aws-cdk-lib/aws-ec2'

export class MyWebServerStack extends cdk.Stack {
  constructor(scope: cdk.Construct, id: string, props?: cdk.StackProps) {
    super(scope, id, props)

    // Create a VPC
    const vpc = new ec2.Vpc(this, 'MyVpc', {
      maxAzs: 2, // Use 2 availability zones
    })

    // Create an EC2 instance
    const instance = new ec2.Instance(this, 'MyInstance', {
      vpc,
      instanceType: ec2.InstanceType.of(ec2.InstanceClass.BURSTABLE2, ec2.InstanceSize.MICRO),
      machineImage: ec2.MachineImage.latestAmazonLinux(),
    })

    // Allow inbound HTTP traffic
    instance.connections.allowFromAnyIpv4(ec2.Port.tcp(80))
  }
}
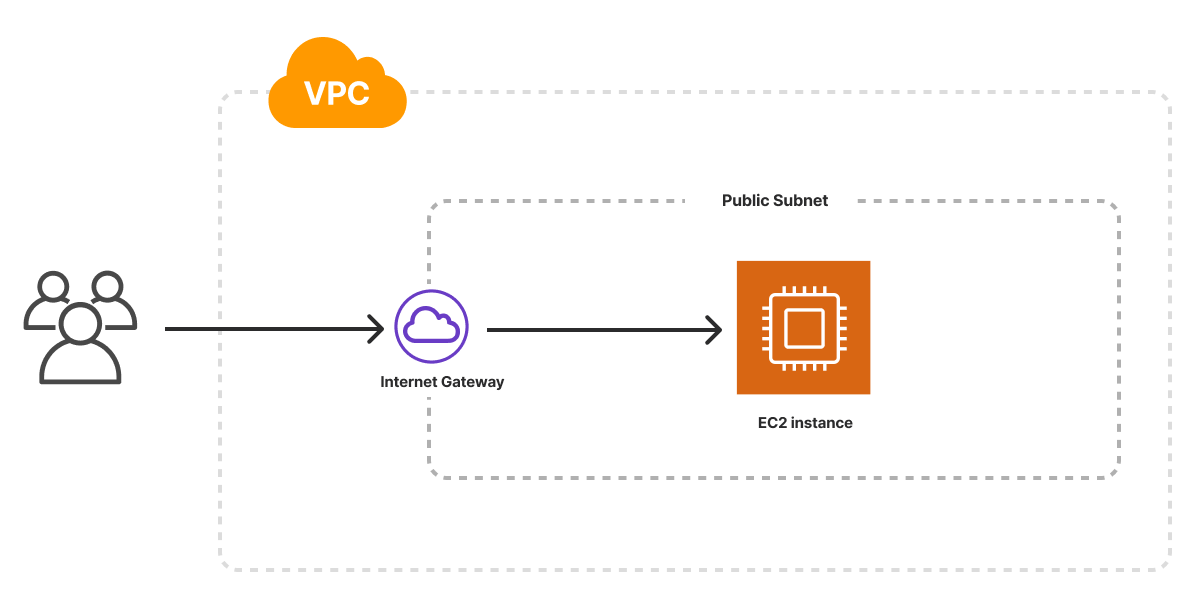
This code creates a VPC, an EC2 instance, and allows inbound HTTP traffic on port 80.
Deploying the Web Server
We are now ready to deploy our web server to AWS. Run the following command in your terminal:
cdk deploy
CDK will ask you to confirm the deployment. Type "y" and press Enter. CDK will then package and deploy your stack, creating the necessary resources on AWS.
Accessing the Web Server
After the deployment is complete, CDK will output the public IP address of your EC2 instance. Look for the line in the terminal that says something like:
MyWebServerStack.MyInstancePublicIP = XX.XX.XX.XX
This is the public IP address of your EC2 instance. Open a web browser and enter this IP address in the address bar.
If everything went well, you should see the default web page of the Amazon Linux AMI, indicating that your web server is up and running.
Conclusion
In this tutorial, we learned how to deploy a web server to AWS EC2 using AWS CDK. We started by setting up our development environment, initializing a new CDK project, and installing the required dependencies. Then, we wrote the CDK code that defined our web server infrastructure, including the creation of a VPC, an EC2 instance, and allowing inbound HTTP traffic. Finally, we deployed the web server to AWS and accessed it using the public IP address.
AWS CDK provides a powerful way to define and deploy infrastructure using code. By leveraging the infrastructure-as-code paradigm, we can automate the process of deploying and managing our resources, making it easier to scale and maintain our applications.
Remember, this tutorial is just the starting point. You can further customize the CDK code to suit your specific requirements. Explore the AWS CDK documentation to discover more features and possibilities for building and deploying your applications in the AWS cloud.
Happy coding and deploying!