Cloudfront restrict user access by signed URLs
- Published on
- Authors
- Name
- Binh Bui
- @bvbinh


Photo by Jeremy Hynes
Cloudfront restrict user access by signed URLs
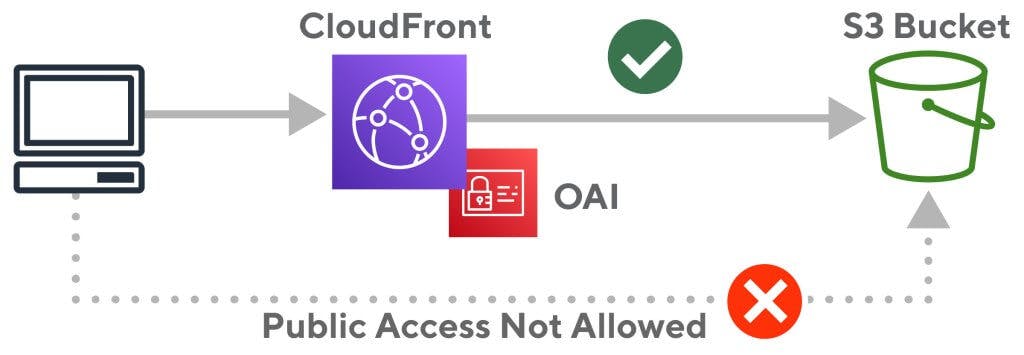
Hiding a S3 bucket behind Cloudfront
Users of CloudFront already know this is the preferred way to provide public access to private S3 data in AWS. The most important improvements over using S3 directly are secure transport using HTTPS instead of HTTP-only that comes with S3 static website hosting, and preventing direct access to the S3 bucket. This also has the additional benefit of using a company’s domain in the URL instead of an ugly randomized CloudFront URL, for example:
https://dopaf13yb3hh2.cloudfront.net/
The steps to hiding a S3 bucket behind Cloudfront. are relatively straightforward:
- Set up a CloudFront distribution
- Give CloudFront an Origin Access Identity (or OAI)
- Point the CloudFront origin to the S3 bucket with the data
- Set the backing S3 bucket policy with s3:GetObject permissions for that OAI.
You can read more about the CloudFront process here: Configuring CloudFront to compress objects in AWS CDK

Here is full example of how to set up a signed CloudFront URL distribution. I used AWS CDK for provisioning the infrastructure.
1. Create a private S3 bucket
const bucket = new s3.Bucket(this, 'MyBucket', {
  removalPolicy: RemovalPolicy.DESTROY, // DELETES the bucket when the stack is deleted
  autoDeleteObjects: true, // DELETES all objects in the bucket when the bucket is deleted
  publicReadAccess: false, // no public access, user must access via cloudfront
  blockPublicAccess: {
    blockPublicAcls: true,
    blockPublicPolicy: true,
    ignorePublicAcls: true,
    restrictPublicBuckets: true,
  },
})
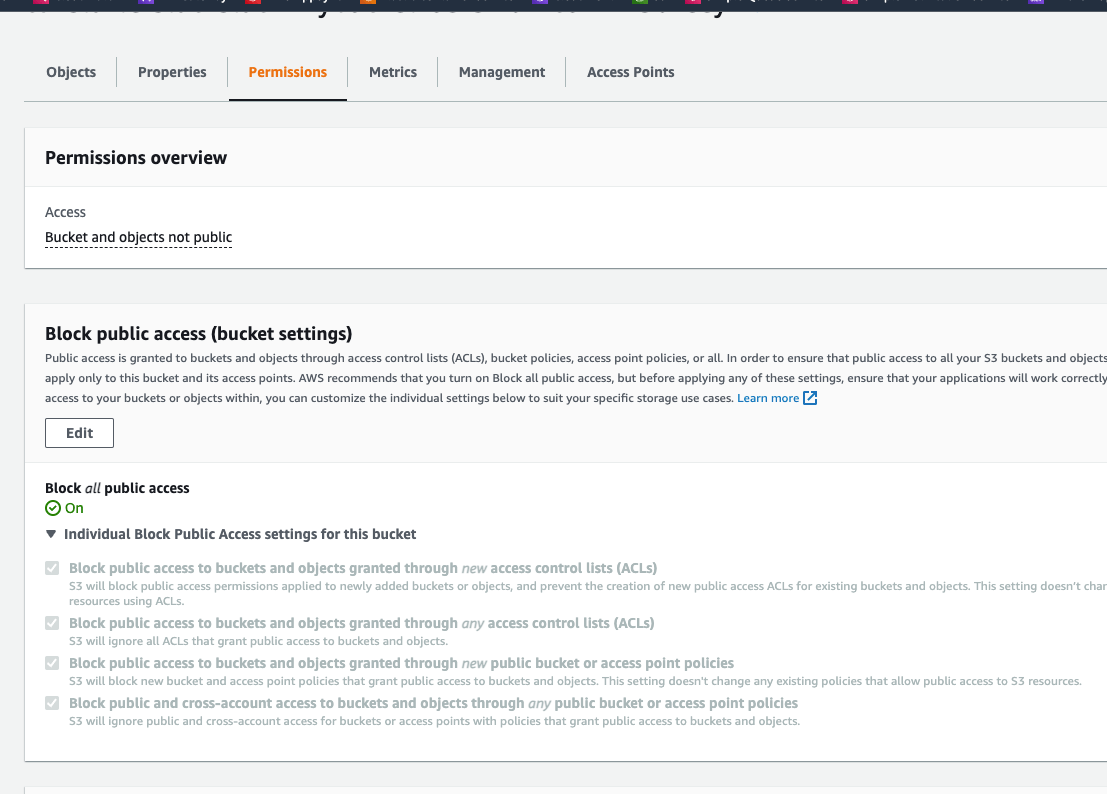
Note that the bucket is not publicly accessible. This is important because the bucket is used to store the signed CloudFront URLs.
The AWS console now will show something like this:

Upload a test file to the bucket.
aws s3 cp ./test.webp s3://cdkstarterstackstack-mybucketf68f3ff0-1c6zx4v30zeey/test.webp
upload: ./test.webp to s3://cdkstarterstackstack-mybucketf68f3ff0-1c6zx4v30zeey/test.webp
aws s3 ls s3://cdkstarterstackstack-mybucketf68f3ff0-1c6zx4v30zeey/
2022-08-01 13:55:51      51672 test.webp
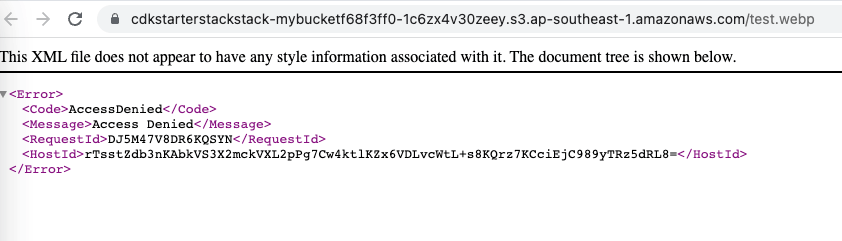
Attempts to fetch this using the S3 endpoint directly should now be blocked:
$ curl https://cdkstarterstackstack-mybucketf68f3ff0-1c6zx4v30zeey.s3.ap-southeast-1.amazonaws.com/test.webp
<?xml version="1.0" encoding="UTF-8"?>
<Error><Code>AccessDenied</Code><Message>Access Denied</Message><RequestId>6HSKKBN0N31Q6056</RequestId><HostId>zQw/XmOaRNLMZjL6I7Cl9KfVZ5d2yt3pPDOIu7Ex/OCa32B02inmWm511Bmr/aFmmnhWS7fIGhI=</HostId></Error>%
This can also be seen in a web browser:

2. CloudFront distribution certificate and identity
In this step we create a CloudFront distribution serving the S3 bucket. I have written a simple example of how to create a CloudFront distribution with OAI and HTTPS.
  // cloudfront OAI (origin access identity)
    const cloudfrontOAI = new cloudfront.OriginAccessIdentity(this, 'my-oai', {
      comment: 'demo-bucket origin access identity',
    });

    // 2. Create a CloudFront distribution
    const distribution = new cloudfront.Distribution(
      this,
      'demo-distribution',
      {
        comment: 'demo distribution',
        defaultBehavior: {
          origin: new origins.S3Origin(bucket, {
            // Restrict viewer access, viewers must use CloudFront signed URLs or signed cookies to access your content.
            originAccessIdentity: cloudfrontOAI,
          }),
          // Serving compressed files
          compress: true,
          // Allowed GET HEAD and OPTIONS requests
          allowedMethods: cloudfront.AllowedMethods.ALLOW_GET_HEAD_OPTIONS,
          cachedMethods: cloudfront.CachedMethods.CACHE_GET_HEAD,
          // redirects from HTTP to HTTPS, using a CloudFront distribution,
          viewerProtocolPolicy:
            cloudfront.ViewerProtocolPolicy.REDIRECT_TO_HTTPS,
          // cachePolicy: cloudfront.CachePolicy.CACHING_OPTIMIZED,
          cachePolicy: new cloudfront.CachePolicy(this, 'CachePolicy', {
            minTtl: Duration.seconds(0),
            defaultTtl: Duration.seconds(3600),
            maxTtl: Duration.seconds(86400),
          }),
          // Using an existing origin request policy for a Distribution
          originRequestPolicy: cloudfront.OriginRequestPolicy.CORS_S3_ORIGIN,
          responseHeadersPolicy: new cloudfront.ResponseHeadersPolicy(
            this,
            'ResponseHeadersPolicy',
            {
              comment: 'A default policy',
              corsBehavior: {
                accessControlAllowCredentials: false,
                accessControlAllowHeaders: ['*'],
                accessControlAllowMethods: ['GET', 'POST'],
                accessControlAllowOrigins: ['*'],
                accessControlExposeHeaders: ['*'],
                originOverride: true,
              },
            }
          ),
        },
        priceClass: cloudfront.PriceClass.PRICE_CLASS_200,
      }
    );
  }
After this step, we can access successful object test.webp via CloudFront url:
curl https://d2b3t97isp5ghd.cloudfront.net/test.webp
Restrict Viewer Access by Using signed URLs
Sometimes you want to restrict access to documents, business data, media streams, or content that is intended for selected users, for example, users who have paid a fee. In this case, you can use signed URLs to restrict access to the content.
Generate a key pair
The following example command uses OpenSSL to generate an RSA key pair with a length of 2048 bits and save to the file named private_key.pem.
openssl genrsa -out private_key.pem 2048
The resulting file contains both the public and the private key. The following example command extracts the public key from the file named private_key.pem.
openssl rsa -pubout -in private_key.pem -out public_key.pem
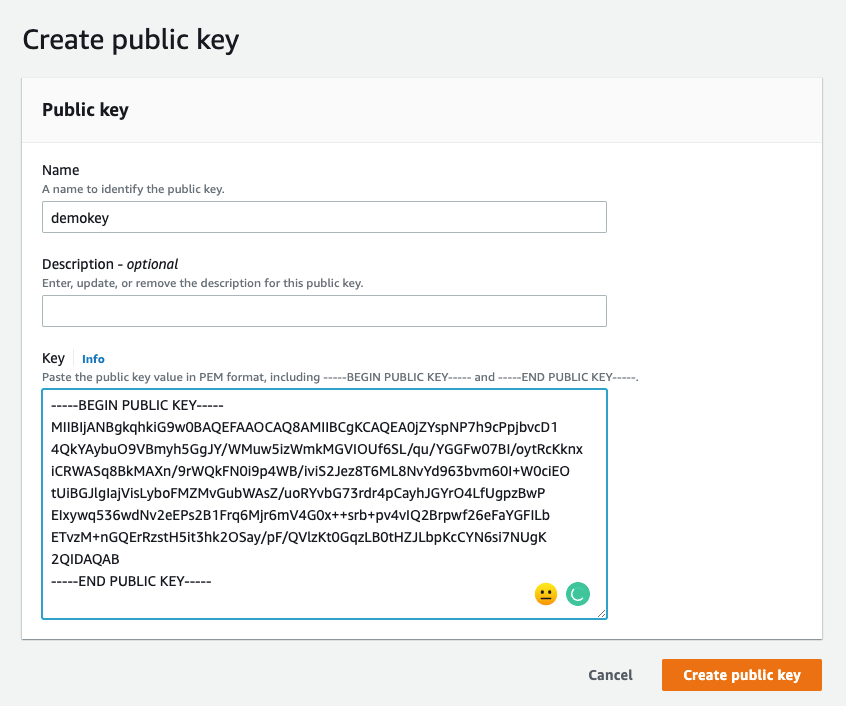
Upload the public key to CloudFront
- Create a public key Open AWS cloudfront console and create a new public key with public key value from the file named public_key.pem.

CDK snippet
const publicKey = new cloudfront.CloudFrontPublicKey(this, 'my-public-key', {
  publicKeyPem: fs.readFileSync('./public_key.pem', 'utf8'),
})
- Create a key group and attach the public key to the key group.
Open AWS cloudfront Key groups and create a new key group.

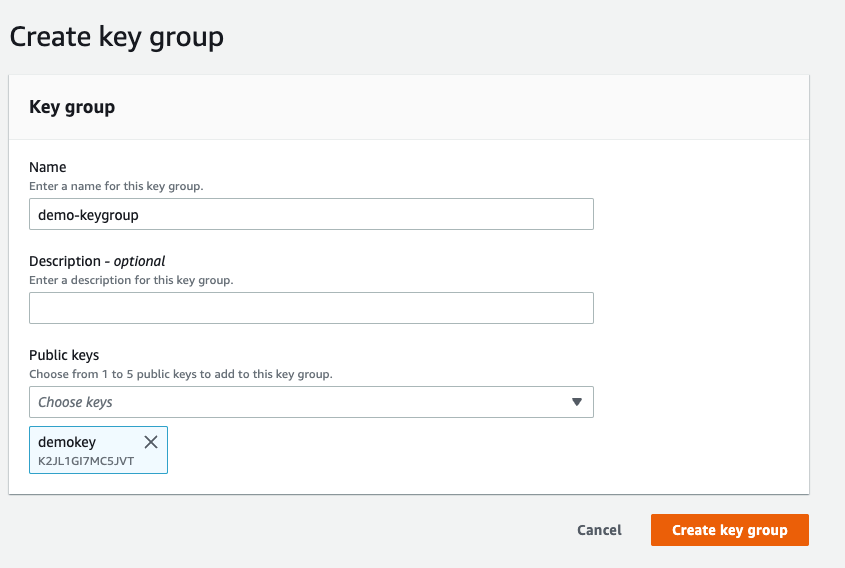
CDK snippet
const keyGroup = new cloudfront.KeyGroup(this, 'MyKeyGroup', {
  items: [pubKey],
  comment: 'demo key group',
})
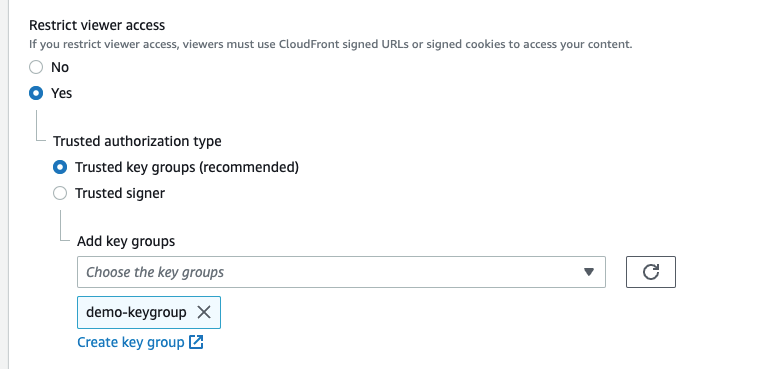
Edit the CloudFront distribution to use the key group
Edit the CloudFront distribution which you created in the previous step to use the key group. Open tab Behaviors and edit Default behavior. Enable Restrict viewer access to YES and choose the key group you created in the previous step.

Save the changes and Now access cloudfront url of file test.webp should be blocked.
curl https://d2b3t97isp5ghd.cloudfront.net/test.webp
<?xml version="1.0" encoding="UTF-8"?><Error><Code>MissingKey</Code><Message>Missing Key-Pair-Id query parameter or cookie value</Message></Error>%
CDK snippet
trustedKeyGroups: [keyGroup],
Now we could not access the file test.webp using the CloudFront url without signing the URL.
Generate a signed URL
The following is Python code which can be used as a signing utility
import argparse
from botocore.signers import CloudFrontSigner
from datetime import datetime, timedelta, timezone
import rsa

def rsa_signer(message):
#    private_key = get_secret(KEY_PRIVATE_KEY)
   private_key = open("./keys/private_key.pem", "r").read()
   return rsa.sign(
       message,
       rsa.PrivateKey.load_pkcs1(private_key.encode('utf8')),
       'SHA-1')  # CloudFront requires SHA-1 hash


def sign_url(url_to_sign, days_valid):
   key_id = 'K2JL1GI7MC5JVT'
   cf_signer = CloudFrontSigner(key_id, rsa_signer)
   signed_url = cf_signer.generate_presigned_url(
       url=url_to_sign, date_less_than=datetime.now(timezone.utc) + timedelta(days=days_valid))
   return signed_url

if __name__ == "__main__":
   my_parser = argparse.ArgumentParser(
       description='CloudFront URL Signing Example')
   my_parser.add_argument('URL',
                          metavar='url',
                          type=str,
                          help='url to sign')
   my_parser.add_argument('--days',
                          metavar='days',
                          nargs='?',
                          const=1,
                          type=int,
                          default=1,
                          help='number of days valid, defaults to 1 if not specified')
   args = my_parser.parse_args()
   url_to_sign = args.URL
   days_valid = args.days

   signed_url = sign_url(url_to_sign, days_valid)
   print(signed_url)
   exit(0)
Upon signing the CloudFront URL with the one-day default expiration, a very long URL is returned. The following shows the expiration time stamp, the signature, and the KeyID (so CloudFront knows which key to check against):
$ python ./sign.py https://d2b3t97isp5ghd.cloudfront.net/test.webp --days 1
https://d2b3t97isp5ghd.cloudfront.net/test.webp?Expires=1659426532&Signature=rywIuZqI5VPM3it--5xIOa-bzj0y0lGN4adG1keBCVW6mQbaxS8sHl1kGCb3M43xBGvjxP3nztjlTWflb0mB7u24nh4jOwz6aGTKyaCyBrBCsjAr5UdsEZYRMLuBnLoVpr-c4NUNclWvmvQuz9AAPKCeogGrax0Bymp-wxphf4LHaLsCD9-aHlsDnmrI8MXe2qCNTn2UHEuMUo6ddUQ6f~-lThh8wClkhDxG8plH7PlPh~pCnATur4S6hiAebNdm2Vl2ESDIT-7p4w-X8lteoRNBE5hXHs7rQRCh0D8qR4mDj0yS9A62wz8dEl3AwJ7ZlxSH1pvHE-ma18pbv5tcTQ__&Key-Pair-Id=K2JL1GI7MC5JVT
Now we can access the file test.webp using the signed URL.


AWS CDK full example
You can find the full example in the AWS CDK GitHub repository